Tuesday, December 6, 2011

Bridesmaid Bouquets

Here are the bridesmaid bouquets that I made...

Supplies needed per bouquet:
3 stems of blue real touch hydrangeas purchased fromHobby Lobby
2 stems of green hydrangeas purchased from Michaels
wire cutters
green floral tape
1 inch wide & 1/2 inch wide ribbon for stems
floral pins


How to make the bouquets:
1. Cut blue hydrangea stems to about 9 inches long

2. Cut green hydrangea bunch off of stem (these stems will be about 6 inches)

3. Start assembling bouquet & playing around with the design.  I first held the blue hydrangeas and then tried to evenly space the smaller gren hydrangeas amongst them.

4.I wanted the stems to be a little thicker, so I re-used the stems that were cut in the first step. If you desire a very thick stem you can cover the stem with a paper towel roll.

5. Once you are satisfied with the design, tightly wrap the stems with the floral tape.  I went over the stems a few times to make sure it was very secure.

6. Attach leaves below the head of the bouquet with floral tape if desired. I used 4 leaves for each bouquet and though the leaves made it look more natural. 

7. You may need to bend the stems of some of the flowers to give it a more rounded shape.

8. Starting at the end of the stem secure an end of the wide ribbon to the stem with a dot of hot glue from your trusty hot glue gun.
9. Wrap the wide ribbon up the rest of the stem and secure the top with another dot of hot glue.

10. Here is a link to the youtube video I used explaing how to create the "french braid" ribbon:
 Using the thinner ribbon starting at the end of the stem and work your way up.  You will need a good bit of ribbon for this and it may take a few tries to make the knots line up.  Once you are at the top of the stem tie a knot and use a pearl tipped floral pin to push the end of the ribbon down into the bouquet so that it isn't visible & secure the pin.  Be careful to not let the pin come out of the other side.

close-up of stem


Sunday, December 4, 2011

My Guilty Pleasures

Here are some funny pics of my guilty pleasure shows :)


Jersey Shore
                                                        Jersey Shore Parenting FAIL!

Twilight

Keeping Up With the Kardashians
This last one just fits since I'm a newlywed and all
(all pics from pinterest)

~What shows are your guilty pleasures?


Wedding Wish Jar

We decided to have a traditional guestbook and a wedding wish jar.  The glass container was purchased at Hobby Lobby for $12.00 and I had the ribbon left over from another project.
I made the small cards using microsoft word & they are printed on card stock paper.  They say "wedding wishes for the brand new mr. & mrs."  and there is a place for the guest's name at the bottom.

The sign says:


As a brand new mr. and mrs
We sure could use
Your advice and good wishes
Share with us your wisdom
About marriage, love, and life
The secret to being a good husband
Or thoughful, loving  wife
Jot down a memory
A reminder of the day
A doodle or picture will do
If you don't know what to say
Please don't forget-
It would be such a shame
Don't drop the card in the bowl
Without signing your name
Weddings are so much more
Than rings and tossed rice
So grab a pen
And write some advice

I used a 5in by 7in frame from the Dollar Tree and printed the sign on card stock and cut to fit the frame.

* This project went over well at the reception.  A lot of guests filled out "wedding wishes" cards.  We took them with us on our honeymoon and read through them.  We got a lot of sweet responses.

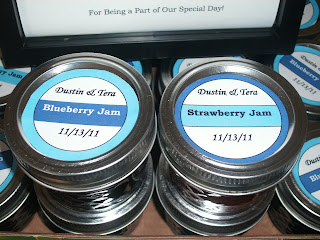
Homemade Jam favors

For our wedding, we wanted to make our own favors & also have it tie in with the southern theme since the wedding was in a venue that looked like a barn.  So, we decided to make strawberry & blueberry jam. This was also a great favor idea for us because it was portable and could be made early.


     All stacked up & ready to go!


   A close-up of the labels I made


                                                          The Favor table sign


Here are the recipes we used:

Blueberry

1.Bring rectanlgular cake pan, half-full with water, to simmer.

2.Wash jars and screw bands in hot, soapy water; rinse with warm water. Pour boiling water over flat lids in saucepan off the heart.  Let stand in hot water until ready to use.  Drain well before filling.

3.Prepare fruit: you will need 3 pt. of blueberries
Wash and discard stems and crush blueberries in a food processor on pulse or chop NO NOT PUREE, you want your jam to have bits of fruit in it.

4.Measure exact amount of prepared fruit: you will need 4 cups of crushed blueberries

5.Measure exact amount of sugar: into a separate bowl.  Not not reduce the amount of sugar or use sugar substitutes for this recipe. You will need 4 cups of sugar

6.Stir 1 box pectin into fruit in saucepot.  Add 1/2 teaspoon butter or margarine to reduce foaming.

7. Bring mixture to full rolling boil (that means a boil that doesn't stop bubbling when stirred) on high heat, stiring constantly.

8.Stir in sugar quickly  Return to full rolling boil for exactly 1 minute, stiring constantly.  Remove from heat.  Skim off any foam.

9. Ladle quickly into prepared jars, filling within 1/8 inch of tops.  Wipe jar rims and threads.  Cover with two-piec lids.  Screw bands tighly.  Place jars on a flat surface upside down for 30 minutes while they cool.  After the jars cool, turn them right side up and you will notice "popping" sounds as the lids seal. Check seals by pressing the middle of lid with finger.  If the lid springs back it's not seals and refrigeration is necessary or you may use a brand new lid and retry. This recipe makes 6 cups.

10. Let stand at room temperature for 24 hrs store unopened jam in a cool, dry, dark place for up to 1 year.


Strawberry

Mostly the same recipe above except:

4 pt. strawberries

wash berries, discard stems, and crush berries.  I didn't use a food processor for the strawberries.  I cut the strawberries inot about 4-5 pieces and then crushed them as I stirred them in the pot.  They will start breaking down on their own from the heat & stirring. 

5 cups sliced strawberries
7 cups of sugar

Makes 8 cups of jam.


ENJOY!!! It's also great to have a helper to put the lids on, wipe the sides, and flip them upside down.  It would be great to get the fiance' involved :)


Update:

Here are some pro wedidng pics of the favors at the reception...


They were a big hit with the guests.

Friday, November 25, 2011

I'm Married!!!!!!!!!!!!!!!!!!!!!!!!!!!! :)

As of November 13, 2011 I am a married woman.  I took a break from blogging for a few weeks because I had so many things to take care of before the wedding.  We planned our South Carolina wedding from upstate New York so we had a lot of details to work out.  I'm very happy with how the wedding turned out and it was one of the best days of my life!! We received lots of compliments about our wedding from the decor, DIY projects, to the food. Not everything went perfectly, but I will save that for another post. I'm so glad that I'm married to my best friend :) 


Here are some non-pro pics taken by friends and family....


                                                                    with my dad

Ceremony


                                                                   Introduction
                                                                    
                                                                    First Dance

Sunday, October 30, 2011

Quotes & Inspiration

Here are some of my faves from pinterest....


Have a great day!!

Friday, October 28, 2011

Cake Topper

Here is my blingy creation:


I purchased a silver colored "M" cake topper from Michaels craft store & painted it blue then glued many, many, blue & green colored bling crystals. 

This is what I used to pick-up the crystals:


Here is the glue:
This project was very, very, very tedious!  It took so long to finish this cake topper.


Here is the topper in action at our wedding...


Thursday, October 27, 2011

Blue Mason Jar DIY Projects

I love the look of vintage blue mason jars but. they are so hard to find & they are pretty pricey.  I came across a blog with instructions on how to make your own by using regular clear glass canning jars or you could even re-use pasta sauce jars.  Here is the link:vintage.htmlhttp://bridalbuzz.blogspot.com/2009/01/glass-jars-turned-vintage.html
I purchased the glaze from Michaels craft store in the secion with the stained glass supplies. One jar of the glaze goes a long way. When I was finished making my blue mason jars I put craft sand and a candle in each one and tied a bow around the top too.  I plan on positioning these on the walkway to the ceremony & reception.


Update: 
Here are some pics from my wedding of the mason jar candle holders


Centerpieces

For months before we went to South Carolina to see our venue I was planning on creating our centerpieces myself.  When we finally were able to see our venue for the first time (yes, I was crazy & booked a venue before seeing it)  I was pleasantly surprised when I was told that you can rent centerpieces from them!! Oh yeahhh I was so glad because I didn't have to buy tons of things, design them, and transport them from NY to SC. 


we decided to keep the centerpieces simple.  We are using a mirror, small candles, a hurricane vase, and royal blue decorative rocks in the base of the vase (one of our wedding colors) scattered on the table are glass crystals.  This is a picture of the mock-up we had when we visited the venue.

Update:
Here are some centerpiece pictures from our reception...


Head Table..


Wednesday, October 26, 2011

Dress Shopping

I went dress shopping at Davids Bridal when they had a big sale. The dress I bought was the second dress that I tried on. I'm not going to post my real wedding dress yet because I want to keep it a secret until the big day!   When I tried on "my dress" I was in LOVE with it & it was everything I wanted! I just felt like I should try on more dress since I would never get to do it again & so I had something to compare "my dress" to.  So, here are the other dresses that I tried on. 

Dress #1...


I didn't like the "pick-up" style of the first dress & due to my lack of boobie the top of the dress looked like it was caving in LOL

Dress # 3


                             I loved the top of dress #3 and the lace-up back but I was not diggin' the skirt


                                                                      Dress #4

I was not feeling this dress at all! I felt like the side draping made me look wide.  You can tell by my expression that I don't like it!


                                                                    Dress #5

This dress was my second favorite but I just wasn't sure about the ruffles at the top & it didn't have a train so it didn't feel very bride-ish to me.  My FMIL saw it and asked me to try it on because she liked it a lot & called it the princess dress.

It was a lot of fun dress shopping :)